Figuring Out the Dental Bur: A Guide to the Different Types in Dentistry
In this article, I want to show you the world of dental burs. We will look at the different kinds and the materials they are made from. We will also talk about the special jobs they are built to do. This guide can help you whether you are a dentist with lots of experience or just starting out. Learning the details of a dental bur can help you do better work. You can think of this as your guide to learning about one of the most basic tools we use.
Table of Contents
What Is a Dental Bur and What Are Its Main Parts?
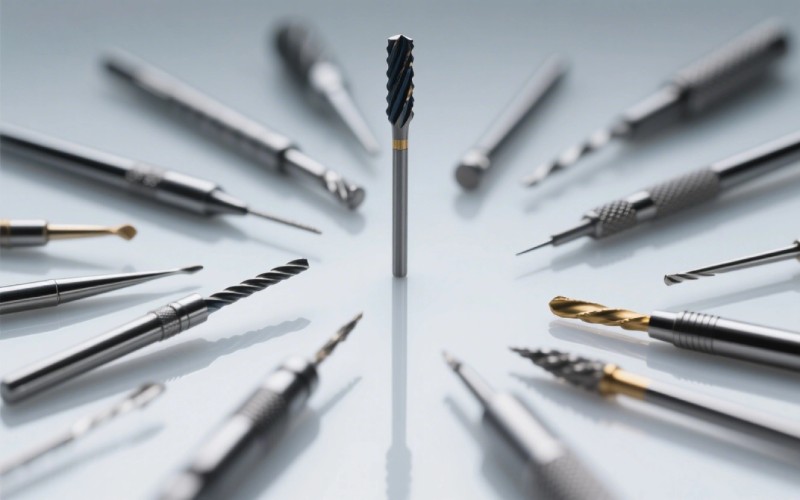
When I was new to dentistry, I thought the simple and smart design of a dental bur was interesting. A dental bur is a spinning tool. It is used to cut, grind, and shape hard things like tooth enamel and bone. Every dental bur has three main parts. These are the head, the neck, and the shank. The head is the part that does the work. It has the blades or rough bits that do the cutting. The neck joins the head to the shank. The shank is the longest part, and it goes into the dental handpiece.
The real cleverness is in how these parts can be different. The shape of the bur head is very important. The material it is made of and the kind of shank also matter a lot. These things decide how the dental bur will work during different dental procedures. For example, a dental bur with a diamond head will grind the tooth. But a dental bur with tungsten carbide blades will cut it. This basic difference in how they work is why it is so important to know about each type of dental bur.
How Are Dental Burs Grouped?
At first, I felt like there were so many different kinds of dental burs. It was a lot to take in. But it all made sense once I learned how they are grouped. Dental burs are put into groups based on a few important things. This helps dentists pick the right tool for a job. The most common way to group them is by the material of the head, the kind of shank, and the shape of the head. There is also a big system for grouping them used around the world. It is called the ISO system. It gives each bur a 15-digit number that tells you all about it.
This ISO system gives a lot of detail. The number tells you the material, like diamond or tungsten carbide. It also tells you the shank type and how rough a diamond bur is. For example, a diamond bur has a color band on its neck. This band tells you how rough it is. Rougher ones are for removing a lot of tooth at once. Smoother ones are for polishing. It might seem like a lot at first. But this way of organizing them helps us do many kinds of dental procedures very carefully.
What Stuff Are Dental Burs Made From?
Through my years as a dentist, I have seen how the material of a dental bur changes how well it works. The four main materials you will see are diamond, tungsten carbide, steel, and ceramic. Each material is special in its own way. This makes each one good for different jobs. Knowing about these materials helps you pick the right bur for any dental procedure.
Here is a simple list of the common materials used for dental burs:
| Material | What’s Special About It | Common Jobs |
|---|---|---|
| Diamond | Made by sticking diamond bits to a steel shank. It is very hard and lasts a long time. | Grinding hard things like enamel, getting teeth ready for crowns and bridges, and working on porcelain. |
| Tungsten Carbide | Made from tungsten carbide. It is three times stronger than steel. It is very sharp and cuts well. | Cavity preparation, taking out old fillings, and shaping bone. |
| Steel | Made from stainless steel. It is softer and can bend more than carbide or diamond. | Taking out soft decay, trimming and finishing fillings, and polishing. |
| Ceramic | Made from things like zirconia. It is safe for the body and does not get very hot. | Working on soft tissues, fixing plastic materials, and cutting bone for implants. |
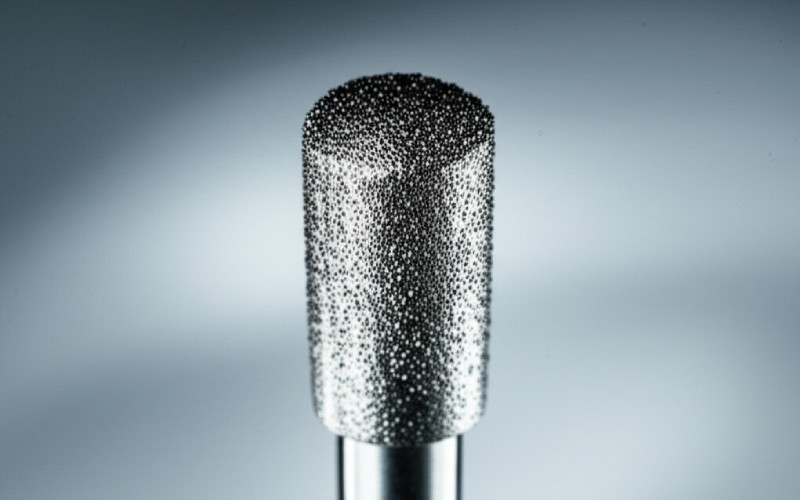
Why Are Diamond Burs So Helpful for Dentists?
If I had to choose a favorite, I might pick the diamond bur. Diamond is the hardest thing found in nature for a reason. It can cut through tooth enamel very well. Diamond burs are made by attaching tiny diamond bits to a surface. This makes a rough surface that is great for grinding away hard tissues. I find them very important for jobs like crown and bridge preparation. For these jobs, you need to be exact and have a smooth finish. They also come in different roughness levels, which gives them many uses.
A diamond bur is the tool I choose for many kinds of dental bur jobs. For example, tapered diamond burs are great for making the clean edges needed for crowns. They also give you great control for careful work. While they might cost more than other types, a good diamond bur lasts a long time and works so well that it is a smart buy for any dental office.
When Is it a Good Idea to Use Carbide Burs?
When I need to cut with power and be very exact, I often use carbide burs. These burs are made from tungsten carbide. They are super strong and stay sharp for a long time. Diamond burs grind away tooth, but carbide burs have blades that slice or chip it. This can leave a smoother surface. This makes them great for many dental procedures. They are especially good for cavity preparation and taking out old fillings.
I find that carbide burs work really well on dentin, which is the layer under the enamel. Their sharp blades remove decay well and do not create as much heat as a diamond bur. They are also what I use to cut through old metal fillings. The different bur shapes, like round and inverted cone, help me make the perfect shape for new dental restorations. Pear-shaped carbide burs, also called 330 burs, are great for making openings and for work on small teeth.
Are Steel Burs Still Used Today?
With all the talk about diamond and carbide, it is easy to forget about the simple steel bur. But I can tell you that steel burs are still a very useful part of my tool kit. They are made from stainless steel, so they are softer and can bend more than carbide and diamond ones. This ability to bend is actually a big plus in some cases. I often use steel burs to take out soft decay because they cut more gently. This helps me save the healthy parts of the a tooth.
Steel burs work best at slower speeds. They are great for the first steps of a cavity preparation and for polishing fillings. They might not last long enough to do a lot of heavy cutting. But because they cost less, they are a good choice for many day-to-day jobs. They are especially helpful when working with children, where you often need a softer touch.
What Are Ceramic Burs All About?
Ceramic burs are a very interesting and useful tool in dentistry. They are made from hard materials that are safe for the body, like zirconia. They have some special good points. One of the biggest benefits I have seen is that they do not carry heat well. This means they do not get as hot as metal burs when you use them. This is a big help in certain dental procedures, especially when working near parts of the mouth that are easy to hurt.
I have found that ceramic burs are wonderful for working on soft parts of the mouth. They can cut very well and cause less harm. They are also great for fixing plastic materials, like dentures, and for finishing fillings. When working on a dental implant, they are a safer choice because they can cut bone without making too much heat. They might cost more, but the special benefits of ceramic burs make them a great tool for certain jobs.
What Do the Different Shapes of Burs Mean?
The shape of the bur head is what really tells you what it is for. I have learned that it is important to have many bur shapes ready to go. This helps me handle the different problems I see in my clinic. Each shape is made for a special reason. Some are for opening a cavity, and others are for making small details for a filling. Let’s look at some of the common head shapes and their jobs.
Here is a list of some important bur head shapes and what they are used for:
- Round Burs: These are true workhorses for me. I use round burs for many things. I use them for the start of a cavity preparation, for taking out decay, and for making an opening for a root canal.
- Pear-Shaped Burs: These are also known as 330 burs. They are great for cavity preparation. They help make little ledges that hold the filling in place.
- Inverted Cone Burs: The shape of these burs is perfect for making undercuts for restorations or root canals. They also make the floor of the cavity preparation flat.
- Tapered Fissure Burs: These burs have sloped heads and are very important for crown and bridge preparation. They help make smooth, sloped walls for the crown to fit on. Cross cut fissure burs are a type that is great for cutting teeth with many roots and making crowns shorter.
- Cylinder Burs: I use these when I first work on a tooth and need to make straight lines. This is helpful for certain kinds of fillings.
- Football Burs: These are also called egg-shaped burs. Football burs can be used for many things, like preparation, finishing, and trimming.
How Does the Shank Change How a Bur is Used?
The shank is the part of the dental bur that goes into the handpiece. Its design is very important so it fits and works right. There are three main kinds of shanks. Each one is made for a different kind of handpiece and speed. Using the right bur with the right handpiece is key to doing any dental procedure in a safe and good way.
Here are the three main kinds of shanks:
- Friction Grip (FG): These are the most common type. They are used with high-speed handpieces. Just like the name says, FG burs are held in by rubbing against the inside of the handpiece. They are used for most filling and crown jobs, including cavity preparation.
- Right Angle (RA) or Latch-type: These shanks go into low-speed handpieces. They have a little cut-out that locks into the handpiece to hold it tight. I use RA burs for jobs that need more power and control at slower speeds. An example is polishing fillings and taking out soft decay.
- Handpiece (HP) or Long Straight Shank: These are used in slow-speed straight handpieces. HP burs are longer. They are often used in dental labs to fix dentures or for some surgery jobs.
Which Shapes of Burs Are Used for Cavity Preparation?
When you are doing a cavity preparation, having the right bur shapes is a big part of the job. The main idea is to take out the decayed part of the tooth well. At the same time, you want to save as much of the healthy tooth as you can. Over my career, I have found a set of burs that I like to use for this important task. I often start by using a round bur to get into the tooth. I might use a diamond or carbide one, depending on if I am cutting enamel or the softer dentin underneath.
After I get inside the tooth, I might change to a pear-shaped bur (a 330 bur). This helps me shape the cavity and make small ledges to hold the filling. To make the bottom of the cavity preparation flat, a straight fissure bur or an inverted cone bur works very well. To finish the walls of the cavity, I might use a very fine diamond bur or a special carbide finishing bur with many blades. The dental bur I choose always depends on how big the cavity is, where it is, and what kind of filling I plan to use.
In Summary
To finish up, here are the main things to remember about the different kinds of dental burs:
- Grouping is Important: Knowing how burs are grouped by material, shank, and shape is key to picking the right one.
- The Material Matters: Diamond burs are for grinding hard things. Carbide burs are for careful cutting. Steel burs are for softer stuff. Ceramic burs are great for jobs where you want to avoid heat.
- Shape Decides the Job: From round burs for starting a hole to tapered fissure burs for crown work, each shape has a special purpose.
- Shank and Handpiece Must Match: Always use the right shank type (FG, RA, or HP) with the correct handpiece. This keeps things safe and working well.
- The Right Bur for the Job: Choosing the right dental bur for each job, like cavity preparation or crown and bridge preparation, will help you get better results.